Revit MEP

Revit MEP

Friday, June 27, 2008

Autodesk Enhances Sustainable Design Capabilities With Acquisition of Ecotect

http://www.squ1.com/

SAN RAFAEL, Calif., June 26 /PRNewswire-FirstCall/ -- As part of its on-going commitment to support the practice of sustainable design and green building in the architecture, engineering and construction (AEC) industries, Autodesk announced another acquisition to improve building performance analysis in the building information modeling (BIM) process. Autodesk announced that it has completed the acquisition of substantially all the assets related to the Ecotect software tools for conceptual building performance analysis from both Square One Research Ltd. and Dr. Andrew Marsh.

The acquisitions of Ecotect and the Green Building Studio assets will support Autodesk's vision to deliver software that enables architects and engineers to design more sustainable projects. With improved building performance analysis capabilities, Autodesk will be uniquely positioned to offer a comprehensive suite of software solutions for sustainable design and analysis, enabling a BIM process that can facilitate cost-effective design and delivery of high-performing, resource-efficient buildings and infrastructure.

The Ecotect tools can measure how fundamental criteria, such as solar, thermal, shading, lighting, and airflow, will affect building performance in the conceptual and detailed phases of design. Their capability to forecast building performance over time better equips architects and engineers to deliver more energy efficient and sustainable building designs.

ECOTECT is a complete building design and environmental analysis tool that covers the full range of simulation and analysis functions required to truly understand how a building design will operate and perform. It finally allows designers to work easily in 3D and apply all the tools necessary for an energy efficient and sustainable future.

ECOTECT: Features in detail

ECOTECT offers a vast range of modelling, visualisation and analysis features. The following links provide detailed information about the different capabilities of the program and how they are implemented and applied.

Autodesk Ecotect can measure how fundamental criteria, such as solar, thermal, shading, lighting, and airflow, will affect building performance in the conceptual and detailed phases of design. This capability to forecast building performance over time better equips architects and engineers to deliver more energy efficient and sustainable building designs.

ECOTECT: Lighting Design

ECOTECT uses the BRE Daylight Factor method for daylighting calculation and the Point-to-Point method for electric lighting. For more detailed analysis you can export your model directly to tools such as DAYSIM and RADIANCE.

Lighting Analysis

ECOTECT now includes a Lighting Wizard to guide you through the process of calculating light and daylight levels in your building.
You can calculate daylight factors and illuminance levels at any points in your model or, as shown above, over the analysis grid.
Geometric and material information in ECOTECT can be exported directly to RADIANCE for a physically accurate lighting simulation.
Using the Radiance Image Viewer that is part of ECOTECT, you can easily generate contoured or false-colour lux and DF images.
Once you have calculated daylight factors in your model, you can use ECOTECT's advanced daylighting features to determine potential savings due to daylight-linked lighting controls or export directly to DAYSIM for a detailed analysis of daylight autonomy.
ECOTECT allows you to edit or import the IES profiles of different lights and luminaires, displaying them directly within the context of your model as you design your lighting system.
These profiles are based on user-definable design illuminance levels set for the zone to which the lights belong, showing illuminance contours as a volumetric boundary at which the required zone illuminance is exactly met by each light.
ECOTECT: Ventilation & Air Flow

ECOTECT allows you to generate both the geometry and analysis grids for export directly to computational fluid dynamics (CFD) tools such as NIST-FDS, Fluent and WinAir4. After the calculations in these tools are complete, it is then possible to import results back into ECOTECT for display within the context of the original model.

If you set up a 3D analysis grid within your model, ECOTECT can export this information directly to a range of Computational Fluid Dynamics (CFD) tools, the results of which can then be imported.
Once you have the results imported back into ECOTECT, you can choose many different visualisation and persentation options.
This can even be viewed as volumetrically as you move about in 3D.
The same processes can be used to look at air flow both through and around buildings or complex urban environments.
Prevailing Winds

Using data in the hourly weather file, ECOTECT can overlay wind speed and direction directly on top of the current model, making it especially relevant to natural ventilation and wind shelter strategies. This plot can also show temperature, humidity and rainfall, over any date and time range.

Plots of prevailing winds from weather data, showing annual wind frequency and speed (left) and summer wind temperatures (right).
Ventilation

The thermal analysis routines in ECOTECT are based on the CIBSE Admittance Method which does not require detailed air-flow and ventilation information. However, as you can see from the Thermal Gallery page, ECOTECT can be used as a pre and post processor for external computational fluid dynamics tools that fully consider air flows.

You may also be interested in the gallery pages, for more examples of ECOTECT in action.

Upgrades For Existing License Holders

Version 5.60 uses a very different license system, however you should be able to upgrade quite easily. If you go to http://ecotect.com/support , near the top should be a link with a title relating to finding your lost activation details. The resulting page will show you how to obtain your new activation code and download the very latest version that you can activate.

Autodesk Green Building Studio analysis tools now available

The Autodesk Green Building Studio analysis tools, now available at http://www.autodesk.com/greenbuildingstudio, provide improved design insight through whole building energy, water and carbon-emission analysis, helping architects and designers to maximize building economic and environmental performance. The tools are compatible with Autodesk design software as well as software from other industry providers through the Green Building XML (gbXML) schema and can now be directly accessed from within the Revit platform for BIM with a new plug-in now available for download. Green Building Studio Inc. launched the Green Building Studio web service in 2004.

The Autodesk® Green Building Studio® web-based energy analysis service can help architects and designers perform whole building analysis, optimize energy efficiency, and work toward carbon neutrality earlier in the design process. With faster, more accurate energy analysis of building design proposals, architects and designers can work with sustainably in mind earlier in the process, plan proactively, and build better.

With the Autodesk® Green Building Studio® web-based energy analysis service, architects and designers can evaluate building components for impact on energy consumption as well as improve economic and environmental performance early in the design process.

Compatible with Revit MEP

The Autodesk Green Building Studio service is an analysis tool that interoperates with Revit® MEP and other compatible energy-analysis software and facilitates team collaboration and information sharing at all stages of design.

Evaluate Energy Profiles of Building Designs

Green Building Studio tools enable architects and designers to evaluate the energy profiles and carbon footprints of various building designs. Files are shared between engineering software programs and among engineers and architects early in the design cycle, making sustainable design more efficient and cost effective.

With Autodesk Green Building Studio tools, you can

  • Capture early sustainable design analysis to support the process of reducing or eliminating negative environmental impacts.
  • Communicate among the extended building design team using Autodesk design applications and other compatible energy and green analysis software.
  • Gain a competitive advantage with increased client satisfaction and improved environmental performance.

Autodesk Green Build Studios Q&A (pdf - 52Kb)


Autodesk’s acquisition of Green Building Studio’s assets was completed on May 1, 2008.

They've completed the migration of the web service to Autodesk’s hardware. New users and existing Green Building Studio customers can now access the web service in the following manner.

  • Current ‘pay-as-you-go’ customers can take advantage of a limited free trial period scheduled to conclude on or about June 30, 2008. Log into your existing account, accept the new Terms of Use agreement, and start realizing carbon neutral design with free analysis on up to two building projects per account.
  • New customers can take advantage of a free 30-day trial period. Create a new user account, accept the Terms of Use agreement, and start realizing carbon neutral design with free analysis on up to two building projects per account.
  • Returning annual subscription corporate customers can continue to use the Autodesk Green Building Studio web service as usual for the remaining term of your original subscription purchase. Just login to your existing account and accept the new Terms of Use agreement.
  • To purchase single user annual subscriptions ($745) and 10-user corporate annual subscriptions ($4,995), login to the Autodesk Green Building Studio web service, accept the new Terms of Use agreement, and select the Upgrade link on the Project List page. Please note, PayPal TM payment services are no longer available. A note to Graphisoft users, the ArchiCAD add-on is temporarily unavailable while we are making updates to our new servers. We do expect availability soon and apologize for the inconvenience.

Users of Autodesk’s Revit®-based software applications who register for the Autodesk Green Building Studio service can now access the service directly with a plug-in available from our Downloads page after login.

If you have questions about a new or existing account, please contact their technical support staff directly via email. Technical support can be reached at support@greenbuildingstudio.com.

Tuesday, June 17, 2008

Autodesk Quantity Takeoff 2009 Product


Link to Autodesk Quantity Takeoff 2009 Brochure


Autodesk Quantity Takeoff was first released in October of 2007. Autodesk Quantity Takeoff (AQTO) software enables cost estimators to gather design data, high-quality images, and precise information from intelligent design applications such as AutoCAD MEP, Revit MEP, and AutoCAD Civil 3D, as well as from “nonintelligent” CAD data and image formats. Use Autodesk AQTO to leverage property data to automatically or manually measure, count, and price various building objects.

Estimators can leverage precise property data to automatically or manually measure, count, and price walls, doors, windows, and other building objects. Results can then be printed, exported to Microsoft Excel, or published to Autodesk DWF, all of which means that Autodesk Quantity Takeoff software supports workflow, from design to cost estimation.

With the integration of 2D and 3D design data, Quantity Takeoff brings drawings and data together seamlessly. The software addresses key requirements for cost estimators by giving users more flexibility than stand-alone design documents, databases, or spreadsheets. The software's open architecture is flexible enough to meet the needs of the multitude of disciplines involved in estimating construction costs.

AQTO sotware is based on Autodesk Design Review software, which provides a complete and all-digital way to view, print, measure, mark up, and revise 2D and 3D designs without the original design creation software. Creating precise and timely cost estimates of 2D and 3D digital design content has never been so easy.

AQTO software has a full set of intuitive manual takeoff tools, enabling you to perform polyline, area, and count takeoffs. Quantity Takeoff also provides more advanced manual takeoff tools for such tasks as backing out specific areas of a measurement, enabling you to account for changes in materials or voids in areas such as atrium space or mechanical chase.

AQTO software leverages the data within intelligent objects created in Revit MEP, AutoCAD MEP, and AutoCAD Civil 3D design applications. This enables cost estimators to quickly and easily search for and count similar items across a project using the Search Takeoff feature.

Cost estimators working in 3D with Quantity Takeoff software can perform intuitive, interactive walkthroughs for examination and estimation of all object details. By utilizing 3D DWF files imported from applications build on the Revit platform, they can perform an entire model takeoff of all 3D design objects with a single click. Object visibility and transparency are adjustable according to building section or component type.

ThomasNet - Source for downloading 3D Manufacturer Equipment


I found this website where you can insert specific manufacturer equipment as solid objects into your AutoCAD MEP dwg directly from the website. Once the dumb 3D solid is inserted, you can create an MvPart from it, and add electrical, hvac or plumbing connectors to it so that it can be used to perform as it would in the BIM Model. You can add property set data to the part as well completing the convertion from a dumb 3D solid; to a rich, data filled working part.
You can also download them in the following formats:
DXF 3D, Step, Acis, Iges, jpg, bmp, png, tif, xml
The ACIS solid will allow you to insert the 3D solid into a Revit MEP family template so that you can add either electrical, hvac or plumbing connectors to it and make it more intelligent and more useful in your BIM Model. You'll be able to add various parameters to this ACIS solid once you convert it to a Revit Family so that you can generate tags and schedules for the equipment.
The advantage of these solids is that they have all the various model sizes and options that the manufacturer provides which is almost unlimited. The drawback is that you can end up creating millions of parts because they are static in size and shape. One of the advantages of drawing them in Revit MEP or AutoCAD MEP instead is that you can create parametric solids that can flex based off of dimensions that can be driven from the users input, or a table. That way you only need one model to drive all the various sizes a part can come in.
It's not exactly what we're looking for in the industry, but it's a start. This gives you the ability to finish the 3D solids yourself and create your own manufacturer specific MEP content in either AutoCAD MEP or Revit MEP. There is 2D content there as well, but that old technology is really worthless in this new age of BIM.

Some day, manufacturers will not only provide their equipment in 3D, but also with all of the needed connectors, data, and also make them parametric so that they can easily be modified on the fly.


Monday, June 16, 2008

Transfer Filters from a Previous View in Revit

There is a fast way to transfer the filters from one view to another whether you have already created the filter, or need to create a new filter for your views.

You can get to the View templates from the SETTINGS pulldown menu, and click on one of the existing View Template names on the left, and Edit the properties of that view template on the right. There you will create a new Filter that will apply to this template. You can also create a new View template on the left, and edit the view properties on the right.

Then you can apply that view template to as many views as you want. You can select multiple views, right click, and apply a view template to them.


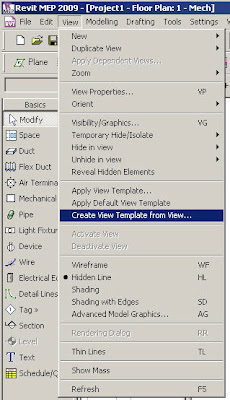
If you already created a filter in another view, you can go to the VIEW pulldown menu and create a view template from the current view that you created the filter from already. Then go back into view template settings, and make any additional modifications to that view template. Then select all the views that you want to apply it to, right click, and apply this view template to them.

Sunday, June 15, 2008

YORK HVAC EQUIPMENT NOW AVAILABLE ON REVIT

Joel Londenberg with Design West Engineering shared this information at AUGI.

We are pleased to announce that all the York rooftop package units from 3 to 5
tons are now in the Revit families and ready to be downloaded in your software.
This tool will save you and your company hours of CAD work. The rooftop units
have been completed with accessories, real time dimensions, voltage, capacities,
etc. The 6.5 to 12.5 tons are in design and should be ready to be downloaded
anytime now!

Please let us know if you have any problems installing this package.


Revit Files Gas Elec ZH0078-150
Revit Files Gas Elec ZJ036-060
Revit Files Heat Pump XP0078-150
Revit Files Heat Pump XP036-060

http://rezine.net/

Friday, June 13, 2008

Revit® MEP 2009 Software Optimization and Best Practices

White Paper From Autodesk


View Performance
The largest impact on View manipulation performance (scroll, pan, zoom operations) is the Model Graphics Style settings. The Hidden Line Style, due to the requirement to dynamically generate gaps and hidden lines when elements overlap in the View, requires the most processing and thus results in a noticeable performance impact in Views with many visible Elements. The following best practices will help to mitigate this performance impact and streamline project workflows.


Modeling and Sheet Views
In order to streamline project workflow, it is recommended to create both Modeling and Sheet Views for the same regions of the building.
Follow these guidelines
  • Modeling Views should be configured to utilize the Wireframe Model Graphics Style.
  • Sheet Views should be configured to utilize the Hidden Line Model Graphics Style to produce the desired appearance for Construction Documentation.
  • Use Dependent Views for your Sheet Views. This allows you to have multiple regions of an overall Level in different views, while not requiring duplicate Annotations.
  • Differentiate Modeling Views from Sheet both in View Name and Sub-Discipline, as see to the right in Figure 1. This will provide a logical organization of the view for users, and help to ensure proper usage.
  • Utilize View Templates to streamline the creation of these Views and achieve consistency.
  • Utilize Duct and Pipe Color Fills only in your Modeling Views, where the Wireframe Model Graphics Style is used.

Figure 1 - Modeling and Sheet Views


Optimizing Hidden Line Performance
Performance in Views with the Hidden Line Model Graphics Style enabled is directly related to the number of Faces displayed in the View. While Elements appear as 2D Lines in a Revit View, they are 3D Objects made up of faces in the model. It is those faces that are processed Revit by the Revit graphics system and show up in the View as 2D Lines. Use the following best practices to optimize the performance of your Views with the Hidden Line Model Graphics Style enabled.

  • Avoid using Fine detail level when working in mechanical views if not necessary, as this displays Pipes as 1-Line Medium detail level is useful for Views working with HVAC systems.
  • If using complex 3D Components in your Building Service designs, turn off the visibility of the complex 3D geometry in your Sheet Views. In place of the complex 3D geometry, utilize Model Lines that convey the overall component shape in the Family definition. Make those Model Lines visible in the Detail Level defined in your Sheet Views.
  • If not necessary for documentation of working on a View, set the Inside and Outside Gap settings for Hidden Lines to 0, as seen on the right in Figure 2. This can provide substantial performance improvements.


Figure 2 - Turning Off Hidden Line Gaps


Model Manipulation Performance
Revit MEP allows users to create models of Building Services, often in the form of large connected networks. The powerful analytical capabilities of Revit MEP, in conjunction with the Revit Parametric Change Engine, allow data to flow throughout the connected network when manipulations are made.

Improper structure and configuration of large connected networks has been shown to have a severe impact on model manipulation performance. In comparative testing, models have been shown to perform up to perform significantly better when structured properly.

As a connected network grows, the performance of model manipulations (moving Elements, changing Flows, connecting new Elements, etc.) is impacted by a number of factors. Understanding these factors, and adhering to the Best Practices outlined below, will allow for optimal model performance.

Create Systems

Create logical Systems for your connected networks, rather than leaving all Elements on the "Default System". Associating Elements into Systems helps to streamline data propagation and facilitates the analytical uses of Systems like Pressure Drop calculations.

Testing of customer models with all elements on the Default System showed significant improvements when the connected network was re-structured as logical Systems.


Set Correct Connector Flow Directions

Ensure that the Flow Direction Parameter for Connectors on Families in the connected network is not set to Bidirectional unless the Family is placed in-line with connected networks like Dampers and Valves. This can make flow determination more difficult and thus impact regeneration performance.

Create Strategic Breaks and/or Use Multiple Files

While maintaining the entire design for a building service in one well connected model allows for full data propagation, the size of the connected network is directly related to its manipulation performance. Testing has shown a linear decrease in manipulation performance as a connected network size grows. The rate of decrease is directly related to the topics mentioned in this section. As the performance of connected networks decreases with larger size, the benefits of data propagation and connectivity are overcome by the need for better model manipulation performance. Thus, for large projects it is a best practice to employ one or both of the following strategies to ensure productive manipulations of your connected networks.

  • Strategic Breaks - Creating disconnections in a connected network stops data propagation during model manipulations, as well as the constraints engine that maintains connections. Product Team testing has determined that strategic breaks in a connected network produces the most significant improvements in model manipulation performance. The recommended practice for this strategy is to create disconnections at logical sections of the connected network. For example, in a VAV air distribution system, create disconnections at the upstream connection point on the VAV box. This allows the VAV flow to still be calculated based upon the downstream Air Terminals. A Duct System Schedule can then be used to manually coordinate flow at the Air Handler or Package Unit. The most efficient way to accomplish such a disconnect, while still maintaining proper appearance for documentation, is to model the upstream element without connecting to the VAV and then using the Align tool to locate the end of the Duct at the same location as the VAV connection. To download a video showing this procedure, click here.
  • Multiple Files - For large, complex buildings, using strategic breaks as well as the aforementioned best practices may still not provide optimum model manipulation performance. In these cases, the model should be built across multiple Revit Project files. There are two fundamental ways to structure the MEP project files, by MEP discipline and by region of the building. Both of these approaches have their benefits and drawbacks, and ultimately it is the choice of the BIM/CAD Manager.
  • By Discipline This strategy creates separate Project files for each MEP discipline, such as a Mechanical, Electrical, Plumbing, Fire Protection files.
  • By Region This strategy creates separate Project files for different regions of the building, keeping all disciplines in each file.
In order to achieve optimal coordination between the MEP disciplines, each discipline must be within the same Revit Project file. This allows disciplines to connect to each other’s elements directly, like electrical connections or drain connections on mechanical equipment. Additionally, Product Team testing has shown that separate connected networks do not have a significant impact on each other; a duct network does not have a significant impact on model manipulation of a plumbing network in the same Project file. With these considerations in mind, it may be helpful to structure large projects by region of the building.

Simplify the Display of Architectural Elements
Simplifying the display of architectural elements may help improve performance by reducing the visible elements that must be generated and maintained within the view. This may be done by overriding the Detail Level in the view.

For example, the Coarse Detail Level may be applied to walls even when the view is configured to use Medium or Fine (refer to figures below). In the Visibility / Graphics Overrides for the view, set the detail level of the appropriate components to the simplest level acceptable.

These settings may be configured in view templates and applied to your views to quickly simplify the detail level throughout your project.


Figure 3: Wall with medium detail level in medium detail view.


Figure 4: Coarse detail overrides for architectural elements.

Figure 5: Wall with coarse detail level in medium detail view.

New Build for Revit MEP 2009

This download is the most recent build for Revit MEP 2009 software as part of the AutoCAD Revit MEP Suite 2009 software product.

It is available to registered users of Revit MEP 2009, and is subject to the terms and conditions of the end-user license agreement that appears during installation.

Download it by clicking here...

Revit MEP 2009 Web Update Enhancement List

Improvements made in Web Update 1 build (20080602_1900):

MEP/Platform Enhancements
  • Improves performance when modifying customer visibility settings for linked files, when many volumes exist that are bound by the linked file.
  • Improves stability when exporting complex views to AutoCAD DWG format, when the hidden lines in those views have a large gap width.
  • United Kingdom content is now included in the English installer.
  • Improves stability when editing a family in the System Editor.
  • Improves stability when upgrading previous release files that contain certain schedule configurations.
  • IES light fixture information exported to the IES now contains correct direction
    information.
  • Improves performance when opening views with multiple unconnected systems.
  • 1 and 2 pole panels can now be assigned to 3 Phase Distribution Systems.
  • Wires in a view no longer impact the display of color fills.
  • Wires are no longer trimmed according to the extents of the light source geometry.
  • Light fixture preview images do not include the light source geometry.
  • Improves the plotting consistency of certain components that are placed over hatched elements in coordination and architectural discipline views.
  • Improves consistency of panel schedule column sizes when panel name is changed.
  • Duct and pipe accessories can now change types without disconnecting from duct and pipe segments.
  • Rooms will now export Revit internal parameters for IFC.
  • When rendering, the progress bar reports correct percent complete.
  • “Intensity” on Decal Types dialog was changed to “Brightness” to match Help Documentation.
  • Spot elevation with Display Elevation = Top & Bottom Elevation will now report the correct bottom elevation for sloped elements.
  • In plan view with medium or fine detail level, spot elevations now report the correct top or bottom elevation of a beam that is joined to a column.
  • Improves stability when changing the visibility of a link in a view template.
  • “Downlight – Spot” light family no longer has duplicate Tilt Angle parameter.
  • Lights that were in a light group that was deleted are no longer controlled by the deleted light group; instead they are controlled by the Ungrouped Lights status.
  • Improves the ability to enter custom DPI value in the Render dialog.
  • Improves stability when exporting to CAD formats.
  • Improves stability when closing SteeringWheels.
  • Improves stability when adding elements to a group.
  • Families that contain arrayed voids will now function properly in the project.
  • Improves stability for users with non-English operating systems when using the Open/Save dialog.
  • Notes created in Revit for a DWF markup object will now propagate to the DWF after selecting publish.
  • Enabling daylight portals will now affect the rendered appearance.
  • Spotting on interior renderings with many internal light sources no longer occurs.
  • Improves appearance of decals using cut-outs.
  • Corrects “Unable to Start” error when starting the application.
  • Model lines now remain in the correct design option when split.
  • For sweeps on an arc wall, you now have the option to change sweep returns.
  • Improves the fidelity of printing and exporting of hidden lines shown in structural and MEP views.

API Enhancements

  • Parameter binding performance has been improved. [API]
  • The JoinType method has been implemented for the LocationCurve of structural members [API]
  • Mullion LocationCurves are now accessible through the API. [API]
  • External programs may now suppress VSTA startup warning messages. [API]
  • The built-in parameter MATERIAL_PARAM_TRANSPARENCY now returns the correct set value. [API]

Visa Lighting 3D Models Available in Sketch Up

Visa Lighting is pleased to announce the expansion of BIM content with the release of the Solution Visa catalog product line in Google Sketch Up. Sketch Up is a 3D software tool that combines a tool-set with an intelligent drawing system. Designed to be an intuitive, flexible, and easy to use 3D modeling program, Google Sketch Up is an excellent tool to introduce designers into the world of 3D modeling. The availability of Visa Lighting files direct from the manufacturer provide free and complete access to the Visa Lighting catalog product information and give users the ability to incorporate specifiable lighting into Sketch Up 3D renderings. Available on disk and the Visa Lighting website as .skp files, the product line can also be found in the Google 3D Warehouse.

In addition to Sketch Up, Visa Lighting is already established in Autodesk Revit and Microstation Bentley formats. Revit families are available on disk, the Visa Lighting website, at bimworld.com and in Autodesk SEEK. SEEK is an online file source for building product information, including 3D models, 2D drawings, visual images, and product specification data. Bentley files are currently available on the BIM World website. BIM World is a free service for designers and architects seeking manufacturers' content.

Helvetica, sans-serif; TEXT-DECORATION: none"
BIM is the direction of the industry, integration of software requires continuous improvement to ensure the best quality of information to BIM users.

Providing BIM files in several different formats, Visa Lighting supplies free product content across a range of BIM software platforms. As seen in Architectural Lighting's 2008 Product Guide, Visa Lighting is a recognized pioneer in the development of manufacturer content files. Jimalee Dakin, Vice President of Sales and Marketing for Visa Lighting, explains, "BIM is the direction of the industry, integration of software requires continuous improvement to ensure the best quality of information to BIM users."