Revit MEP

Revit MEP

Thursday, March 31, 2011

Phoenix Controls Now Offers Building Information Modeling (BIM)


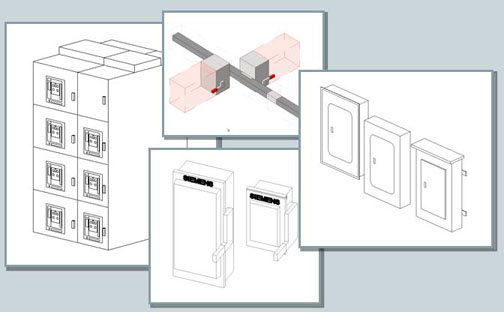
ACTON, Mass. – March 28, 2011 – Phoenix Controls, a Honeywell International business, today announced the official release of BIM objects covering the Company’s entire family of Venturi Valves. The signature brands of Celeris®, Traccel®, and Theris®are all represented. Working in conjunction with SMARTBIM, a leader in the industry for development of BIM objects, Phoenix Controls has taken what a typical manufacturer provides to the next level.
"BIM is the way of the future in the design of facilities. The benefits of BIM are well documented, but the reality is manufacturers are behind the curve." said Dave Boisvert, Vice President of Engineering at Phoenix Controls. "We need to provide the industry with the correct tools to make sure they are properly specifying our products. We recognized this and heard the demands of our customers which is why we made the considerable investment to provide some of the most advanced objects to the design community"
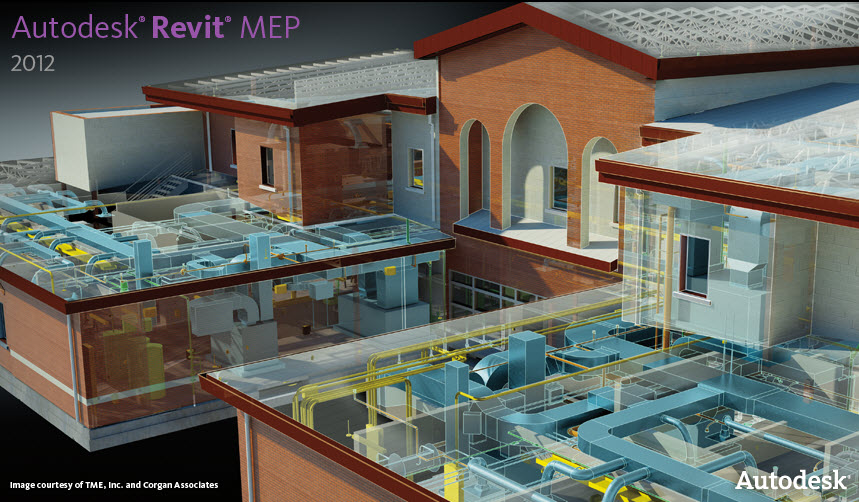
Phoenix Controls library of BIM objects, which are fully compatible with Autodesk® Revit®, house a wealth of information and will provide owners a valuable resource for the maintenance and operations of their facilities. As BIM grows and adapts to the rapidly increasing requirements of the industry, so too will Phoenix Controls and our offering. Our objects can be found on our company’s website at http://www.phoenixcontrols.com/resource-valve-drawings.htm. They are also available for distribution through SMARTBIM’s object library at http://smartbim.com.
Phoenix Controls is a worldwide developer of precision airflow control systems for critical room environments, such as laboratories, hospitals, vivariums and biocontainment facilities.
Phoenix Controls is a business of Honeywell International and is registered to ISO 9001:2008. Celeris, Traccel and Theris are registered trademarks of Phoenix Controls.
Contact:
Justin Dascoli, Marketing Manager
Phoenix Controls
(978) 795-3433
jdascoli@phoenixcontrols.com

Wednesday, March 23, 2011

3Dconnexion Announces Revit 2012 Support

3Dconnexion today announced much anticipated 3D mouse support for Autodesk Revit 2012 software applications, as well as Autodesk Navisworks 2012, bringing the full range of 3D mouse design benefits to Revit and Navisworks users.
3Dconnexion 3D mice complement the intuitive interface and modeling and documentation tools in Revit software, helping to enhance every design workflow stage with increased productivity and comfort. 3D mice allow Revit and Navisworks users to pan, zoom and rotate simultaneously to deliver superior navigation and more intuitive control, helping to boost productivity and efficiency while aiding user comfort.

I have not personally used a 3D mouse, but I would imagine it would take some getting used to.  Steve Stafford has mentioned this device in his blog and is currently testing it.  But the reviews sound good.  I can imagine a device like this would be benificial in software programs like Navisworks even more than Revit.


Tuesday, March 22, 2011

Preserving Autodesk BIM Information in Autodesk® 3ds Max® Design

Revit MEP 2012 New Features

I've been kicking the tires on the beta release of Revit MEP 2012 for the past few months, and I am really looking forward to using the new version.  In last years 2011 version, most improvements came from the enhancements to the electrical portion of the software.  This year, plumbing was the big winner.  Trying to create plumbing systems that worked in real world designs took a lot of effort to make work.  Especially sloped pipe.  A lot of firms used workarounds and created Revit plumbing layouts based off of pipe types or worksets or other means other than by system as Autodesk had intended.  It now looks as though firms should rethink these workarounds, and actually create pipe systems based off of real pipe types the way Autodesk intended it to be used.  Of course, there are other enhancements to existing tools, and totally new tools and features that were added as well. 

Even though there are numerous improvements to the software that will make our Revit MEP world a lot easier, we can't open the box, install the software, and just jump into the new version on our next project.  One of the disadvantages of a user of MEP, is that we have to follow the architects lead.  While there are enhancements in Revit Architecture, the architectural new features aren't as much of a game changer as the new features in Revit MEP.  The Revit Architecture software is on it's 25th release in 11 years while Revit MEP is on its 7th release in 5 years.  So it isn't as mature as it's architectural big brother.  So architects might not see the need to upgrade until maybe June... September... or even next year on their projects.  And because project teams should always work in similar Revit build numbers, MEP users might not have the chance to become more productive with the new features until an architect decides to either A) Upgrade an existing project, or B) Start a new project in the new 2012 version.

But when teams do decide to work in 2012, this is just a few of the things you have to look forward to.
  • Tagging Elements in Linked Files.   I'm not sure on this first feature.  I'm sure I'll find a way this feature will help me in the future, but right now, it just confused me as to where my room/space tags were derived from.  Were they created from the copy rooms feature, or are they tagged from the linked file?
  • MEP Fixture Copy/Monitor improvements.  This was one of my favorite 2011 new features, and it just got better.  When an architect takes the time, and places generic plumbing fixtures and generic light fixtures in their model, why spend our time repeating their work?  With the copy/monitor tool, we can swap out all of the architects fixtures with MEP fixtures that match our specifications.  And now there are more fixture types that we can do this swapping with.  There was a stadium type project I was working on, where there were hundreds and hundreds of water closets in the project.  It would have taken me hours to place our spec WC over the architects generic WC for all the locations.  But using the Copy/Monitor tool, I had all of our Kohler WC families replace the architects "out-of-the-box" Revit WC.  And when the architect decided to move those fixtures 12 inches to the left, I received a notification that they moved because my fixtures were monitoring their fixtures.  Love this tool.
  • Revit Server. Will now support running either Revit 2011 and/or Revit 2012 projects.  Also supports the new worksharing enhancements in 2012.  (See worksharing enhancements below).  Using Revit Server in an office environment that has multiple offices connected over the LAN, this tool is essential to becoming more efficient.  Trying to create a local Revit file over the LAN will take forever, and while the file is opening, it will tie down the central file making it impossible for current uses to modify elements that haven't been checked out or save to central.  In the past, I was asked to make a construction bulletin that would take me about 5 minutes, but opening my local file took over an hour over the LAN.  Thank goodness for multi-tasking.
  • Worksharing Enhancements.  It surprising to me how long this feature has been in the software, and never worked right.  It seems like it was a placeholder for something bigger and better to come.  Well, that time might be now.  When you wanted to modify a fixture or system, and it was being used by another user, Revit had a dialog box that made it seem like you could make a request through Revit, and ask that user to relinquish it.  But that user need to open the "Editing Requests" dialog box to see these requests.  And that never happened at a time when you needed it to happen, like right now.  So you ended up just calling them on the phone.  Then there was the Worksharing Monitor Add-In.  This at least had a dialog box that could stay open while you were working that you could throw up on a second monitor or something so that you could see these requests as they happened.  But A)It was a separate install that seemed to never get installed. and B) It was a separate program that needed to be opened and running after you opened Revit.    Well, now that we have a little background, here is a couple of the new features.  First is that you could never disable worksharing.  Once you enabled worksharing on a project, that project was going to be workshared forever.  Second, you can set the visibilty of worksets in a view template now.  Third, there are new color display modes allowing users to visualize owners of objects by color, or ownership status of elements by color, or elements that are out of date by color, or which elements are assigned to particular worksets by color.  It can be toggled on and off.  Fourth, Revit now provides balloon notifications when editing requests are placed, granted, and denied.  So now you don't have to check the Editing Requests box to see if someone is waiting on you, or install the Worksharing monitor and open a separate dialog box to check these requests. 
  • Starting View.  This was a known issue, that Revit opened slow if the last view that was open when the project was saved, was a complex view.  So users had to remember to create a simple view, usually with just text of the project name and number, and to have that as the last view open when saving and closing the project down.  But now there is a setting under the Manage Tab, where you can specify which view you want to be the Starting View so users don't have to remember which view they should go to when saving the project.
  • Workset changeable without editablity. In the properties palette, the workset parameter can now be edited without first borrowing the element.  Before, that parameter was greyed out until you had ownership of that element.
  • Enhancements to DWG Export tool. The export setting are displayed on a series of tabs making it easier to map layers, lines, patterns, text and fonts to AutoCAD styles.
  • Locking 3D Views and Tagging 3D views.  This is a biggy.  In the past, you could only put dumb text in a 3D view.  Never a smart tag.  And if you rotated that view, the text would skew because it was on another plane.  Now, as long as you lock a 3D view down, (which is new) you can tag a Revit element.  You won't be able to lock the default 3D view, but create a copy, and that one will be lockable.  Just beware, you can't tag a room/space in a 3D view.
  • Schedule and Legend Creation from Project Browser.  This is nice.  Before, you had to open up the Views Tab on the ribbon to create a view of these types.  Now just right click on Schedule or Legend in the project browser, and create new.
  • Save all Families.  Users can save all families that are loaded into a project to a directory.  This is nice for helping create future project templates.  You might finish a hospital project using a lot of hospital families, and you want to now create a Revit hospital project template.  You can now save those families in a batch type of method from the previous hospital project and load them into your new template.
  • Round Function in Formulas.  Values in formulas can be now rounded up or down. Round(x), Roundup(x), rounddown(x).
  • Materials.  There is significant changes to using materials in elements in Revit 2012.  While there is a significant amount of work "under the hood" that is not user visible, the items that are available to users this version focus around efficiency in managing materials within Revit, and introducing a library concept that will be extended in the future.
  • WikiHelp.  Revit online help is now provided as WikiHelp. In addition to viewing the Autodesk-provided help content, users can rate and comment on content, and they can add their own articles, images, and videos. If you are online and you access context-sensitive help (click a Help button or press F1), by default you go to the WikiHelp. If you are offline and access context-sensitive help, by default you will go to a locally stored copy of the help system.
  • Sloped Piping.  A user can now create the pipe slope values in the Mechanical Settings. The slope values can be transferred from project to project.  This new method, along with additional new sloped fittings seems to allow the creation of sloped piping systems much easier and consistent.  There still needs to be best practices and methods that should be followed when creating sloped pipe.  You won't be able to just draw sloped pipe in any direction from any starting point.  There needs to be a thought out strategy to where you are going to start your main sloped pipe system, and where it's going to end, and how it's going to be integrated by the fixtures.  It was hard, but I've had success creating sloped piping in previous versions, but this version is much less work and headache to create a sloped system.  I'm not saying it's going to be easy, but with a well laid out plan, you can be very successful creating sloped pipe is a rather short period of time.
  • System Browser.   This was always an overlooked feature in the past because so many engineers just wanted construction documents and not an engineered system.  So systems were rarely created in MEP projects.  But this tool should be used more for multiple reasons, but one is just based off of better performance of the model.  Unconnected systems dramatically decrease the speed of the project.  You can view all of the connected and disconnected systems from the System Browser.  Selecting elements in the system browser also selects the element in the project.  And if you press Shift or CTRL, you can select multiple connectors.  Also, in the old version, if you selected elements in your model, they were not selected in the system browser.  Now they will be selected in both areas when you pick them.
  • Graphical Overrides for Duct and Piping Systems.  You can now create and name duct and piping system types from a predefined set of "basic" system types. A duct or piping system type contains properties for graphical overrides. You have the ability to control the color, line weight, and line pattern for the collection of objects assigned to a system using these. The graphic overrides applies to the project, they are not view specific like Filters are.   Similar to other system families, the duct and piping system types are now available in the Project Browser similar to how pipe types are in the Project Browser. The duct and piping system types are sorted under Families in the family category folder "Duct Systems" and "Piping Systems".   Use the "Other" system type when creating a custom system of a type that is not native to Revit MEP.  For example, if you wanted to create an Oxygen System, duplicate the Other system type and rename it to Oxygen. You can get to the system type properties for a particular duct or pipe by pre-selecting the element and pressing Tab until the system is highlighted. With the system selected, in the Property palette, click Edit Type to access the type properties of the system.  In the Type Properties dialog for duct and piping systems, click Graphic Overrides to display a dialog where you can override the Line Weight, Color, and Line Pattern.  The "system" overrides for the graphic attributes are prioritized between Phasing and Filters. This means the color, line pattern, material, etc. per system type, will override the settings per category. However, a view filter takes precedence over the system type settings.
  • Rendering Material for Duct and Pipe systems.  This was something users always asked me, and I always told them that you couldn't change the material for system families.  But it looks like the game has changed when it comes to materials.  You can apply a specific rendering material that is different from the physical material.
  • Ability to Specify a System When Placing a Duct or Pipe.  Another game changer.  You know have the ability to specify a "system" on a duct or pipe without attaching it to a fixture or equipment.  When inserting a duct or pipe, a new System Type parameter is available in the properties palette.
  • Create Duct and Pipe Systems from a Selection of Fixtures.  When you create a system from a fixture or equipment, it is now possible to select a system type and a system name for the system and start in the system editor right away.  In the past, you had to first create the system, then go to the system editor to edit the system.  It took multiple steps, when now it's all in one step and much faster to do with less mouse clicks to do the same thing.
  • Graphical Warnings for Analyzing and Validating Duct and Pipe Systems.  This is a feature that AutoCAD MEP has had for years.  It's a toggle on/off that can show system disconnects with a warning marker.
  • Turning off System Calculations.    When I first read this, I thought to myself, "That's not new."  But now you can turn off a particular system, rather than turning off all calculations.  There is a new parameter on the system type properties to limit or turn off system calculations.
  • System Connector Labels.  This is nice.  In the past, you had to hover over a connector and wait to see what type of connector you were dealing with.  Now you can identify the properties of a connector from the leader and a label showing the system type, size, flow, direction, and fixture units. 
  • Modify Systems while Adding Duct or Pipe.    This will save a lot of time too.  You can modify the system of fixtures or equipment while laying out duct or pipe instead of ending your command, and opening the system editor, and editing the system of that equipment.  So for example, if you connect an unassigned return grille to a return duct system, it will automatically place that grille on the return duct system, rather than having to edit the return system, and add the grille manually.
  • Ability to Create Interconnected Systems.   You can now connect systems that use different system types.  For example, vent and sanitary systems may now be connected.  In the past, as soon as you connected a vent sub-system to a sanitary system, the vent system changed to sanitary and your override filters that showed the linetypes of the two different systems all changed to one linetype in your drawings, thus not showing any venting on your project.  Very bad.  So workarounds were developed to evercome this.  But you no longer need to use those workarounds now that we can interconnect systems, and they stay separated.
  • Create Duct or Pipe Placeholder Elements.   Placeholder objects are ducts and pipes that can be used early in the design stage to indicate the approximate location of a duct or pipe run, or to show a layout that hasn’t been fully sized and you do not want to show the ducts or pipes as double line geometry. You are able to create a duct or pipe placeholder layout path. The placeholder layout path is a simplified duct or pipe without fittings. These objects allow for easy creation, modification, and future conversion to the more detailed ducts or pipe layouts currently available. The workflow is that you create placeholder layout path, modify the layout path, and then converts to the real two-line duct or pipe layout. In the past, the automatic layout path that Revit created was useless.  And editing the path was more work than just manually drawing pipe or duct.  I can't imagine that the automatic layout path tool got any better, but I can imagine that modifying the layout path that was generated has improved.  The jury will be out on the benefit of this feature, as it gets used in real world applications.
  • Parallel Conduits and Parallel Pipe Runs.  You can now create new conduit runs or pipe runs parallel with the existing conduit or pipe run.  The key to this feature is that you draw one baseline run, and then run the parallel runs afterwards to match the first run.  There will be two options for the fittings.  Either the same bend radius or concentric bend radius.
  • Insulation and Lining.  In the past, the best way to add insulation and lining was to create a pipe/duct schedule, and create columns to show different systems, and add insulation and lining through a schedule.  That still might be the best way, but now you cn add insulation to an entire duct or pipe run with a single command.  Before, you could only do it to one piece. 
  • Interference Check for duct/pipe Insulation.  A new option in the Run Interference Check is Duct insulation and pipe insulation.  In the past, you could only run interference checks on the pipe or duct objects themselves.  And if you wanted to check if the insulation would interfere, you had to draw pipe/duct by not the actual size, but by the size that included the insulation without insulation.
  • Panel Schedules.  You can now choose to display panel schedule totals in either current or load values.  Previously it was only load values.  You can also change the way that multi-poled circuits are displayed in the panel schedule.  There is a new toggle to wither merge 2 or 3 pole circuits into a single thicker cell, or leave them as 2 or 3 separate cells.  There a new feature to show the number of slots from the equiment instead of a setting.  You can also now control various capitalization options for a circuit's load name.  And finally, you now have the ability to display connected load classifications in the panel schedule.  For any load classification used by a load connected to the circuit, the connected load classification can show in the properties palette for an electrical circuit.
While there are a ton of new enhancements to make Revit MEP 2012 better than before, they haven't solved every wishlist item we've been asking for.  Some tools take years to develop and to work correctly in a final release.  Autodesk won't release a new feature if it hasn't been tested internally or by the beta users and works flawlessly.  Sometimes new features are introduced in segments, where you'll only see a portion of what the final feature will look like in years to come.  The developers can't create the world in 6 days like someone I know, but it's a process. 

I hope you learned something new by this post, and I look forward to this new release.

Monday, March 21, 2011

Book Review: Mastering Autodesk Revit MEP 2011


Revit MEP has been out since August 2006, or almost 5 years now.  And new versions are usually released in mid-April.  This coming version will be the 7th release.  While the software has been around for a while, there hasn't been any good advanced documentation or books on the software.  In 2008, while attending AU, I was approached by a book publisher to write a Revit MEP book because so many people were asking for one, and none existed.  While I was excited about the opportunity, I couldn't find time in my schedule with a two year old and a newborn.

Over the last year, I've started to see some new books come out on Revit MEP.  But the one that is above the others is this one by Don Bokmiller, Marvin Titlow and Simon Whitbread.  I've done Revit MEP training with the AOTC courseware since the software was first released in 2006, and I wish that I had a resource like this book to train from.  While there is a learning curve of the basics, this book takes users to the next level and shows how Revit MEP is used in real world projects from start to finish, and not just showing you how to do a couple simple tasks that are part of a smoke-and-mirrors dataset.

I always say there are two types of people looking for knowledge on Revit MEP, and you must adjust your training accordingly.  There is the end user, who wants to know how do connect equipment, duct, pipe, lights, etc and read the engineering data that is generated from those connections.  Then there is the BIM manager, who wants to know how to get the equipment and connections to display correct for construction documents, and the engineering data to calculate correctly, and get projects to run quickly and efficiently.  But sometimes knowledge of how Revit works in the background is helpful for both types of end users of the software. And this book accomplished that.

While some books only apply to one type of Revit user, I really recommend this book for all users of Revit MEP.  It's in depth, and applies to all types of Revit users.  Even when a new Revit software version is released, this book will still be relevant.

This paperback book can be purchased directly from the publisher here:

or an Adobe E-Book can be purchased and downloaded from the publisher here:

or a paperback book from Amazon here:

AutoCAD Revit MEP Suite
  • VER      BUILD                NAME     
  • 1.0       2006 04 01    (Revit Systems 1) (1)
  • 2.0       2006 09 01    (Revit Systems 2) (2)
  • 2008    2007 04 12    (Revit MEP 2008, AutoCAD MEP 2008) (3)
  • 2009    2008 04 15    (Revit MEP 2009, AutoCAD MEP 2008) (4)
  • 2010    2009 04 16    (Revit MEP 2010, AutoCAD MEP 2010) (5)
  • 2011    2010 04 16    (Revit MEP 2011, AutoCAD MEP 2011) (6)  

Friday, March 04, 2011

Electrical Building Information Modeling (BIM) for Revit® MEP Families Now Available from Siemens

Distribution families to be AutoDesk Seek RMC Styleguide compliant

BUFFALO GROVE, Ill. – Siemens Industry, Inc., announces the availability of Building Information Modeling (BIM) for the company’s low voltage distribution equipment, making its Revit® MEP Family of products more easily available to architects and engineers during the design phase. Siemens continues its industry leadership, not only by offering the most comprehensive set of BIM families, but by being the first and only provider delivering BIM low-voltage distribution product families developed in full compliance with AutoDesk® Seek® RMC SG standards.  The Siemens library of electrical distribution products will be available on the AutoDesk Seek website starting March 15.
 

Press Contact
Steve Kuehn